VirtualBox | Use Dual OS on Single System |

For YouTube Guidance Click Here
VirtualBox
Oracle VM VirtualBox (formerly Sun VirtualBox, Sun xVM VirtualBox and Innotek VirtualBox) is a free and open-source hosted hypervisor for x86 virtualization, developed by Oracle Corporation. Created by Innotek, it was acquired by Sun Microsystems in 2008, which was in turn acquired by Oracle in 2010.
VirtualBox may be installed on Windows, macOS, Linux, Solaris and OpenSolaris. There are also ports to FreeBSD and Genode.[5] It supports the creation and management of guest virtual machines running Windows, Linux, BSD, OS/2, Solaris, Haiku, and OSx86, as well as limited virtualization of macOS guests on Apple hardware. For some guest operating systems, a "Guest Additions" package of device drivers and system applications is available, which typically improves performance, especially that of graphics.
Emulated environment
Users of VirtualBox can load multiple guest OSes under a single host operating-system (host OS). Each guest can be started, paused and stopped independently within its own virtual machine (VM). The user can independently configure each VM and run it under a choice of software-based virtualization or hardware assisted virtualization if the underlying host hardware supports this. The host OS and guest OSs and applications can communicate with each other through a number of mechanisms including a common clipboard and a virtualized network facility. Guest VMs can also directly communicate with each other if configured to do so.
How to Use
After installation, you can start Oracle VM VirtualBox as follows:
On a Windows host, in the Programs menu, click on the item in the VirtualBox group. On some Windows platforms, you can also enter VirtualBox in the search box of the Start menu.
On a Mac OS X host, in the Finder, double-click on the VirtualBox item in the Applications folder. You may want to drag this item onto your Dock.
On a Linux or Oracle Solaris host, depending on your desktop environment, an Oracle VM VirtualBox item may have been placed in either the System or System Tools group of your Applications menu. Alternatively, you can enter VirtualBox in a terminal window.
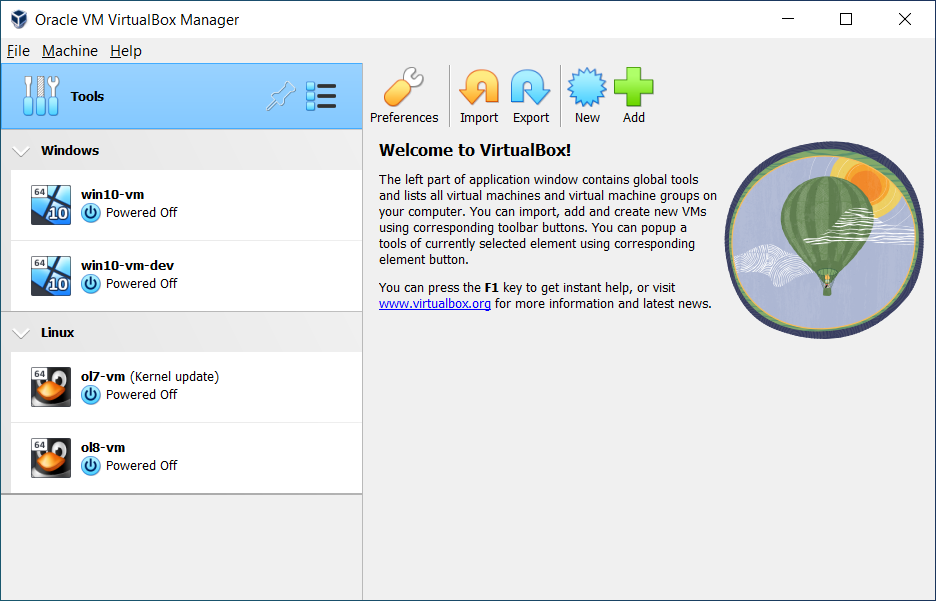
When you start Oracle VM VirtualBox for the first time, a window like the following is displayed:
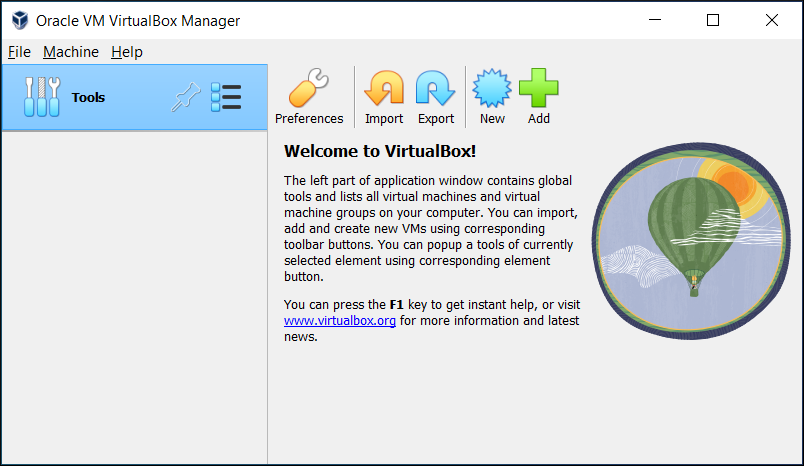
This window is called the VirtualBox Manager. The left pane will later list all your virtual machines. Since you have not yet created any virtual machines, this list is empty. The Tools button provides access to user tools, such as the Virtual Media Manager.
The pane on the right displays the properties of the currently selected virtual machine. Since you do not have any machines yet, the pane displays a welcome message.
The buttons on the right pane are used to create and work with VMs.
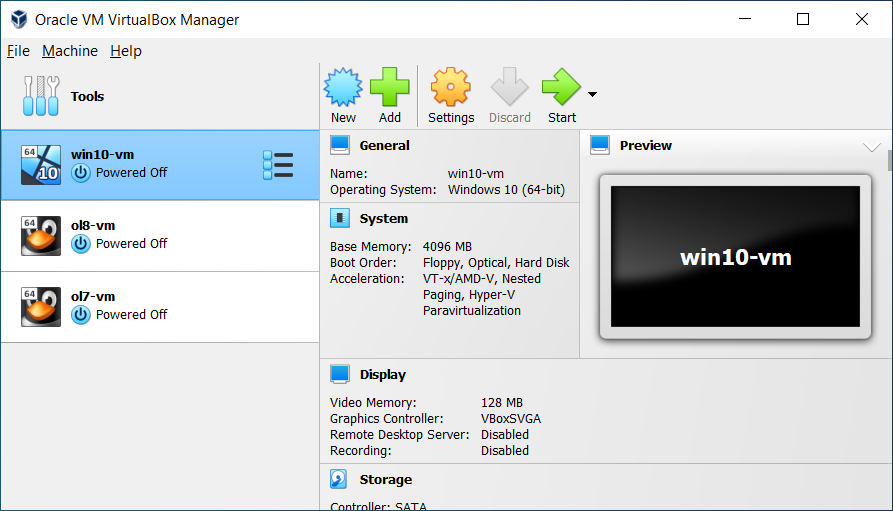
The following figure gives an idea of what Oracle VM VirtualBox might look like after you have created some VMs.
Click New in the VirtualBox Manager window. A wizard is shown, to guide you through setting up a new virtual machine (VM).
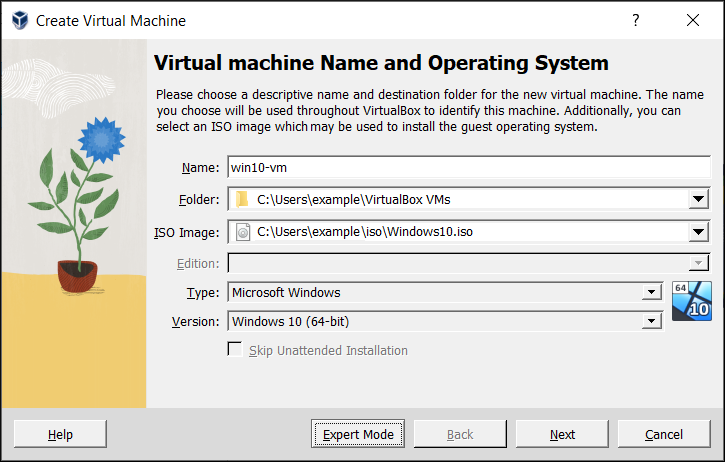
On the following pages, the wizard will ask you for the bare minimum of information that is needed to create a VM, in particular:
The Name of the VM you choose is shown in the machine list of the VirtualBox Manager window and is also used for the VM's files on disk.
Be sure to assign each VM an informative name that describes the OS and software running on the VM. For example,
Windows 10 with Visio.The Machine Folder is the location where VMs are stored on your computer. The default folder location is shown.
For Operating System Type, select the OS that you want to install. The supported OSes are grouped. If you want to install something very unusual that is not listed, select Other. Depending on your selection, Oracle VM VirtualBox will enable or disable certain VM settings that your guest OS may require. This is particularly important for 64-bit guests. See Section 3.1.2, “64-bit Guests”. It is therefore recommended to always set it to the correct value.
On the next page, select the Memory (RAM) that Oracle VM VirtualBox should allocate every time the virtual machine is started. The amount of memory given here will be taken away from your host machine and presented to the guest OS, which will report this size as the virtual computer's installed RAM.
Caution
Choose this setting carefully. The memory you give to the VM will not be available to your host OS while the VM is running, so do not specify more than you can spare.
For example, if your host machine has 4 GB of RAM and you enter 2048 MB as the amount of RAM for a particular virtual machine, you will only have 2 GB left for all the other software on your host while the VM is running. If you run two VMs at the same time, even more memory will be allocated for the second VM, which may not even be able to start if that memory is not available.
On the other hand, you should specify as much as your guest OS and your applications will require to run properly. A guest OS may require at least 1 or 2 GB of memory to install and boot up. For best performance, more memory than that may be required.
Always ensure that the host OS has enough RAM remaining. If insufficient RAM remains, the system might excessively swap memory to the hard disk, which effectively brings the host system to a standstill.
As with the other settings, you can change this setting later, after you have created the VM.
Next, you must specify a Virtual Hard Disk for your VM.
There are many and potentially complicated ways in which Oracle VM VirtualBox can provide hard disk space to a VM, see Chapter 5, Virtual Storage, but the most common way is to use a large image file on your physical hard disk, whose contents Oracle VM VirtualBox presents to your VM as if it were a complete hard disk. This file then represents an entire hard disk, so you can even copy it to another host and use it with another Oracle VM VirtualBox installation.
The wizard displays the following window:
At this screen, you have the following options:
To create a new, empty virtual hard disk, click the Create button.
You can pick an existing disk image file.
The drop-down list presented in the window lists all disk images which are currently remembered by Oracle VM VirtualBox. These disk images are currently attached to a virtual machine, or have been attached to a virtual machine.
Alternatively, click on the small folder icon next to the drop-down list. In the displayed file dialog, you can click Add to select any disk image file on your host disk.
If you are using Oracle VM VirtualBox for the first time, you will want to create a new disk image. Click the Create button.
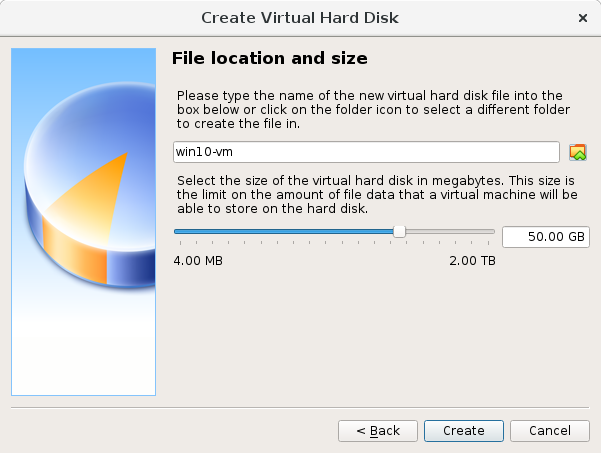
This displays another window, the Create Virtual Hard Disk Wizard wizard. This wizard helps you to create a new disk image file in the new virtual machine's folder.
Oracle VM VirtualBox supports the following types of image files:
A dynamically allocated file only grows in size when the guest actually stores data on its virtual hard disk. Therefore, this file is small initially. As the drive is filled with data, the file grows to the specified size.
A fixed-size file immediately occupies the file specified, even if only a fraction of that virtual hard disk space is actually in use. While occupying much more space, a fixed-size file incurs less overhead and is therefore slightly faster than a dynamically allocated file.
For details about the differences, see Section 5.2, “Disk Image Files (VDI, VMDK, VHD, HDD)”.
To prevent your physical hard disk (host OS) from filling up, Oracle VM VirtualBox limits the size of the image file. But the image file must be large enough to hold the contents of the guest OS and the applications you want to install. For a Windows or Linux guest, you will probably need several gigabytes for any serious use. The limit of the image file size can be changed later, see Section 8.22, “VBoxManage modifymedium”.
After having selected or created your image file, click Next to go to the next page.
Click Create, to create your new virtual machine. The virtual machine is displayed in the list on the left side of the VirtualBox Manager window, with the name that you entered initially.
Note
After becoming familiar with the use of wizards, consider using the Expert Mode available in some wizards. Where available, this is selectable using a button, and speeds up the process of using wizards.
To start a virtual machine, you have several options:
Double-click on the VM's entry in the list in the VirtualBox Manager window.
Select the VM's entry in the list in the VirtualBox Manager window, and click Start at the top of the window.
Go to the
VirtualBox VMsfolder in your system user's home directory. Find the subdirectory of the machine you want to start and double-click on the machine settings file. This file has a.vboxfile extension.
Starting a virtual machine displays a new window, and the virtual machine which you selected will boot up. Everything which would normally be seen on the virtual system's monitor is shown in the window. See the screenshot image in Chapter 1, First Steps.
In general, you can use the virtual machine as you would use a real computer. There are couple of points worth mentioning however.
When a VM is started for the first time, the First Start Wizard, is displayed. This wizard helps you to select an installation medium. Since the VM is created empty, it would otherwise behave just like a real computer with no OS installed. It will do nothing and display an error message that no bootable OS was found.
For this reason, the wizard helps you to select a medium to install an OS from.
If you have physical CD or DVD media from which you want to install your guest OS, such as a Windows installation CD or DVD, put the media into your host's CD or DVD drive.
In the wizard's drop-down list of installation media, select Host Drive with the correct drive letter. In the case of a Linux host, choose a device file. This will allow your VM to access the media in your host drive, and you can proceed to install from there.
If you have downloaded installation media from the Internet in the form of an ISO image file such as with a Linux distribution, you would normally burn this file to an empty CD or DVD and proceed as described above. With Oracle VM VirtualBox however, you can skip this step and mount the ISO file directly. Oracle VM VirtualBox will then present this file as a CD or DVD-ROM drive to the virtual machine, much like it does with virtual hard disk images.
In this case, the wizard's drop-down list contains a list of installation media that were previously used with Oracle VM VirtualBox.
If your medium is not in the list, especially if you are using Oracle VM VirtualBox for the first time, click the small folder icon next to the drop-down list to display a standard file dialog. Here you can pick an image file on your host disks.
After completing the choices in the wizard, you will be able to install your OS.
Oracle VM VirtualBox provides a virtual USB tablet device to new virtual machines through which mouse events are communicated to the guest OS. If you are running a modern guest OS that can handle such devices, mouse support may work out of the box without the mouse being captured as described below. See Section 3.5.1, “Motherboard Tab”.
Otherwise, if the virtual machine detects only standard PS/2 mouse and keyboard devices, since the OS in the virtual machine does not know that it is not running on a real computer, it expects to have exclusive control over your keyboard and mouse. But unless you are running the VM in full screen mode, your VM needs to share keyboard and mouse with other applications and possibly other VMs on your host.
After installing a guest OS and before you install the Guest Additions, described later, either your VM or the rest of your computer can "own" the keyboard and the mouse. Both cannot own the keyboard and mouse at the same time. You will see a second mouse pointer which is always confined to the limits of the VM window. You activate the VM by clicking inside it.
To return ownership of keyboard and mouse to your host OS, Oracle VM VirtualBox reserves a special key on your keyboard: the Host key. By default, this is the right Ctrl key on your keyboard. On a Mac host, the default Host key is the left Command key. You can change this default in the Oracle VM VirtualBox Global Settings. See Section 1.15, “Global Settings”. The current setting for the Host key is always displayed at the bottom right of your VM window.

This means the following:
Your keyboard is owned by the VM if the VM window on your host desktop has the keyboard focus. If you have many windows open in your guest OS, the window that has the focus in your VM is used. This means that if you want to enter text within your VM, click on the title bar of your VM window first.
To release keyboard ownership, press the Host key. As explained above, this is typically the right Ctrl key.
Note that while the VM owns the keyboard, some key sequences, such as Alt+Tab, will no longer be seen by the host, but will go to the guest instead. After you press the Host key to reenable the host keyboard, all key presses will go through the host again, so that sequences such as Alt+Tab will no longer reach the guest. For technical reasons it may not be possible for the VM to get all keyboard input even when it does own the keyboard. Examples of this are the Ctrl+Alt+Del sequence on Windows hosts or single keys grabbed by other applications on X11 hosts such as the GNOME desktop Locate Pointer feature.
Your mouse is owned by the VM only after you have clicked in the VM window. The host mouse pointer will disappear, and your mouse will drive the guest's pointer instead of your normal mouse pointer.
Note that mouse ownership is independent of that of the keyboard. Even after you have clicked on a titlebar to be able to enter text into the VM window, your mouse is not necessarily owned by the VM yet.
To release ownership of your mouse by the VM, press the Host key.
As this behavior is inconvenient, Oracle VM VirtualBox provides a set of tools and device drivers for guest systems called the Oracle VM VirtualBox Guest Additions. These tools make VM keyboard and mouse operations much more seamless. Most importantly, the Guest Additions suppress the second "guest" mouse pointer and make your host mouse pointer work directly in the guest. See Chapter 4, Guest Additions.
Some OSes expect certain key combinations to initiate certain procedures. The key combinations that you type into a VM might target the host OS, the Oracle VM VirtualBox software, or the guest OS. The recipient of these keypresses depends on a number of factors, including the key combination itself.
Host OSes reserve certain key combinations for themselves. For example, you cannot use the Ctrl+Alt+Delete combination to reboot the guest OS in your VM because this key combination is usually hard-wired into the host OS. So, even though both the Windows and Linux OSes intercept this key combination, only the host OS would be rebooted.
On Linux and Oracle Solaris hosts, which use the X Window System, the key combination Ctrl+Alt+Backspace normally resets the X server and restarts the entire graphical user interface. As the X server intercepts this combination, pressing it will usually restart your host graphical user interface and kill all running programs, including Oracle VM VirtualBox, in the process.
On Linux hosts supporting virtual terminals, the key combination Ctrl+Alt+Fx, where Fx is one of the function keys from F1 to F12, normally enables you to switch between virtual terminals. As with Ctrl+Alt+Delete, these combinations are intercepted by the host OS and therefore always switch terminals on the host.
If, instead, you want to send these key combinations to the guest OS in the virtual machine, you will need to use one of the following methods:
Use the items in the Input, Keyboard menu of the virtual machine window. This menu includes the settings Insert Ctrl+Alt+Delete and Insert Ctrl+Alt+Backspace. However, the latter setting affects only Linux guests or Oracle Solaris guests.
This menu also includes an option for inserting the Host key combination.
Use special key combinations with the Host key, which is normally the right Control key. Oracle VM VirtualBox then translates the following key combinations for the VM:
Host key + Del sends Ctrl+Alt+Del to reboot the guest OS.
Host key + Backspace sends Ctrl+Alt+Backspace to restart the graphical user interface of a Linux or Oracle Solaris guest.
Host key + Function key. For example, use this key combination to simulate Ctrl+Alt+Fx to switch between virtual terminals in a Linux guest.
For some other keyboard combinations such as Alt+Tab to switch between open windows, Oracle VM VirtualBox enables you to configure whether these combinations will affect the host or the guest, if a virtual machine currently has the focus. This is a global setting for all virtual machines and can be found under File, Preferences, Input.
A soft keyboard can be used to input key combinations in the guest. See Section 1.17, “Soft Keyboard”.
While a virtual machine is running, you can change removable media in the Devices menu of the VM's window. Here you can select in detail what Oracle VM VirtualBox presents to your VM as a CD, DVD, or floppy drive.
The settings are the same as those available for the VM in the Settings dialog of the Oracle VM VirtualBox main window. But as the Settings dialog is disabled while the VM is in the Running or Saved state, the Devices menu saves you from having to shut down and restart the VM every time you want to change media.
Using the Devices menu, you can attach the host drive to the guest or select a floppy or DVD image, as described in Section 3.7, “Storage Settings”.
The Devices menu also includes an option for creating a virtual ISO (VISO) from selected files on the host.
You can resize the VM's window while that VM is running. When you do, the window is scaled as follows:
If you have scaled mode enabled, then the virtual machine's screen will be scaled to the size of the window. This can be useful if you have many machines running and want to have a look at one of them while it is running in the background. Alternatively, it might be useful to enlarge a window if the VM's output screen is very small, for example because you are running an old OS in it.
To enable scaled mode, press Host key + C, or select Scaled Mode from the View menu in the VM window. To leave scaled mode, press Host key + C again.
The aspect ratio of the guest screen is preserved when resizing the window. To ignore the aspect ratio, press Shift during the resize operation.
See Chapter 14, Known Limitations for additional remarks.
If you have the Guest Additions installed and they support automatic resizing, the Guest Additions will automatically adjust the screen resolution of the guest OS. For example, if you are running a Windows guest with a resolution of 1024x768 pixels and you then resize the VM window to make it 100 pixels wider, the Guest Additions will change the Windows display resolution to 1124x768.
Otherwise, if the window is bigger than the VM's screen, the screen will be centered. If it is smaller, then scroll bars will be added to the machine window.
When you click on the Close button of your virtual machine window, at the top right of the window, just like you would close any other window on your system, Oracle VM VirtualBox asks you whether you want to save or power off the VM. As a shortcut, you can also press Host key + Q.
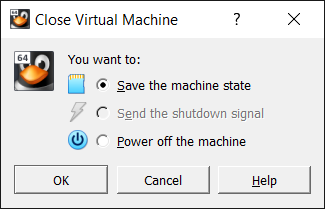
The difference between the three options is crucial. They mean the following:
Save the machine state: With this option, Oracle VM VirtualBox freezes the virtual machine by completely saving its state to your local disk.
When you start the VM again later, you will find that the VM continues exactly where it was left off. All your programs will still be open, and your computer resumes operation. Saving the state of a virtual machine is thus in some ways similar to suspending a laptop computer by closing its lid.
Send the shutdown signal. This will send an ACPI shutdown signal to the virtual machine, which has the same effect as if you had pressed the power button on a real computer. This should trigger a proper shutdown mechanism from within the VM.
Power off the machine: With this option, Oracle VM VirtualBox also stops running the virtual machine, but without saving its state.
Warning
This is equivalent to pulling the power plug on a real computer without shutting it down properly. If you start the machine again after powering it off, your OS will have to reboot completely and may begin a lengthy check of its virtual system disks. As a result, this should not normally be done, since it can potentially cause data loss or an inconsistent state of the guest system on disk.
As an exception, if your virtual machine has any snapshots, see Section 1.10, “Snapshots”, you can use this option to quickly restore the current snapshot of the virtual machine. In that case, powering off the machine will not disrupt its state, but any changes made since that snapshot was taken will be lost.
The Discard button in the VirtualBox Manager window discards a virtual machine's saved state. This has the same effect as powering it off, and the same warnings apply.
VM groups enable the user to create ad hoc groups of VMs, and to manage and perform functions on them collectively, as well as individually.
The following figure shows VM groups displayed in VirtualBox Manager.
The following features are available for groups:
Create a group using the VirtualBox Manager. Do one of the following:
Drag one VM on top of another VM.
Select multiple VMs and select Group from the right-click menu.
Create and manage a group using the command line. Do one of the following:
Create a group and assign a VM. For example:
VBoxManage modifyvm "vm01" --groups "/TestGroup"
This command creates a group "TestGroup" and attaches the VM "vm01" to that group.
Detach a VM from the group, and delete the group if empty. For example:
VBoxManage modifyvm "vm01" --groups ""
This command detaches all groups from the VM "vm01" and deletes the empty group.
Create multiple groups. For example:
VBoxManage modifyvm "vm01" --groups "/TestGroup,/TestGroup2"
This command creates the groups "TestGroup" and "TestGroup2", if they do not exist, and attaches the VM "vm01" to both of them.
Create nested groups, having a group hierarchy. For example:
VBoxManage modifyvm "vm01" --groups "/TestGroup/TestGroup2"
This command attaches the VM "vm01" to the subgroup "TestGroup2" of the "TestGroup" group.
The following is a summary of group commands: Start, Pause, Reset, Close (save state, send shutdown signal, poweroff), Discard Saved State, Show in File System, Sort.


Comments
Post a Comment